In a nutshell
- 🌱 How it works: Cardboard acts as a breathable, light-blocking barrier that suppresses weeds, feeds soil life, and decomposes into carbon-rich organic matter—core to sheet mulching and lasagna gardening.
- 📦 Materials & prep: Use plain brown corrugated cardboard; remove tape/staples; avoid waxed or glossy boxes; pre-soak and overlap generously; pair with a nitrogen source (compost/manure) to balance carbon.
- 🛠️ Step-by-step: Mow low, lay and soak cardboard with 6–8 in overlaps (12 in for invasives), add 1–2 in compost plus 2–4 in mulch, plant via X-cuts, keep mulch off trunks, and maintain seams as it breaks down in 6–12 months.
- 🌧️ Benefits: Reduced watering, improved soil structure, richer microbial activity, less reliance on herbicides and plastics, preserved mycorrhizae, and potential carbon sequestration—ideal for lawn conversions and urban plots.
- 🗓️ Timing & tips: Lay in fall and plant in spring; stock extra cardboard; maintain a 2–3 in gap around trunks; pick straw over hay; re-mulch to keep pressure low as the barrier decomposes.
Gardeners talk about hacks. This one earns the name. A layer of humble shipping boxes, laid flat and mulched, can flip a scrappy patch of ground into a fertile bed without backbreaking tilling or chemical herbicides. It blocks weeds while feeding the soil. The approach goes by many names—sheet mulching, lasagna gardening—but the core idea is simple and surprisingly elegant. Cardboard smothers existing growth, invites worms to dinner, and slowly turns into carbon-rich organic matter. The result? Quieter weekends, richer beds, and a garden that leans on biology instead of brute force. Here’s how, why, and what to watch for when you try it at home.
How the Cardboard Method Works
Think of cardboard as a temporary, biodegradable blanket. When overlapped and wetted, it forms a light-tight barrier that starves weeds of sunlight while still letting air and water move through. Roots below lose energy; shoots above fail to photosynthesize. Unlike plastic, which can cook soil and repel rain, cardboard breathes. That balance—blocking light without sealing the ground—is the secret. As soil stays dark and moist, an underground workforce of fungi, bacteria, and earthworms activates. They chew through cellulose and glue the crumbs into aggregates that improve structure.
As the cardboard breaks down, it adds carbon, the scaffolding that soil organisms use to build habitat. Pair it with a nitrogen source, such as compost or well-aged manure, and you avoid temporary nutrient tie-up. The cardboard decays in several months to a year, depending on climate and thickness, leaving behind friable soil that resists erosion. Weed pressure falls dramatically because buried seeds lack light and surface weeds can’t punch through the mat. It’s low-tech suppression with high ecological payoff.
For gardeners converting a lawn or taming a wild corner, the method excels. You skip tilling, which can unearth a seed bank and chop beneficial fungi. Instead, you create a calm, shaded zone where roots loosen on their own, moisture lingers longer, and life reorders the profile from the microbe up. The payoff builds season after season.
Choosing and Preparing the Right Cardboard
Use plain brown corrugated cardboard. It’s sturdy, porous, and usually bonded with starch-based adhesives that soil organisms relish. Remove all tape, labels, staples, and strapping—those create plastic litter and weak points where weeds slip through. Avoid waxed produce boxes, glossy coatings, and heavy color printing. These resist water and slow breakdown, undermining the process. Thin cereal boxes can work in a pinch, but they compact quickly; layer them thicker and overlap more.
Before laying, flatten boxes and pre-soak them with a hose or in a wheelbarrow. Wet sheets conform to ground contours and seal seams. If you’re concerned about persistent weeds like Bermuda grass or bindweed, double up layers and extend overlaps generously. Preparation is the difference between a one-season fix and a long-term solution. Here’s a quick guide:
| Cardboard Type | Best Use | What to Avoid |
|---|---|---|
| Brown corrugated | General sheet mulching; lawn-to-garden conversions | Leave no tape or staples attached |
| Thin boxboard (cereal) | Small patches; supplemental layers | Overreliance without extra overlap |
| Waxed/glossy | None | Water repellency, slow decay, contamination risk |
Gather more cardboard than you think you need. Edges, curves, and tree rings consume material fast. Keep a utility knife handy to custom-fit pieces, and plan a 2–3 inch gap around woody trunks to prevent rot. Clean materials and tight seams make the barrier dependable.
Step-by-Step: Laying, Mulching, and Watering
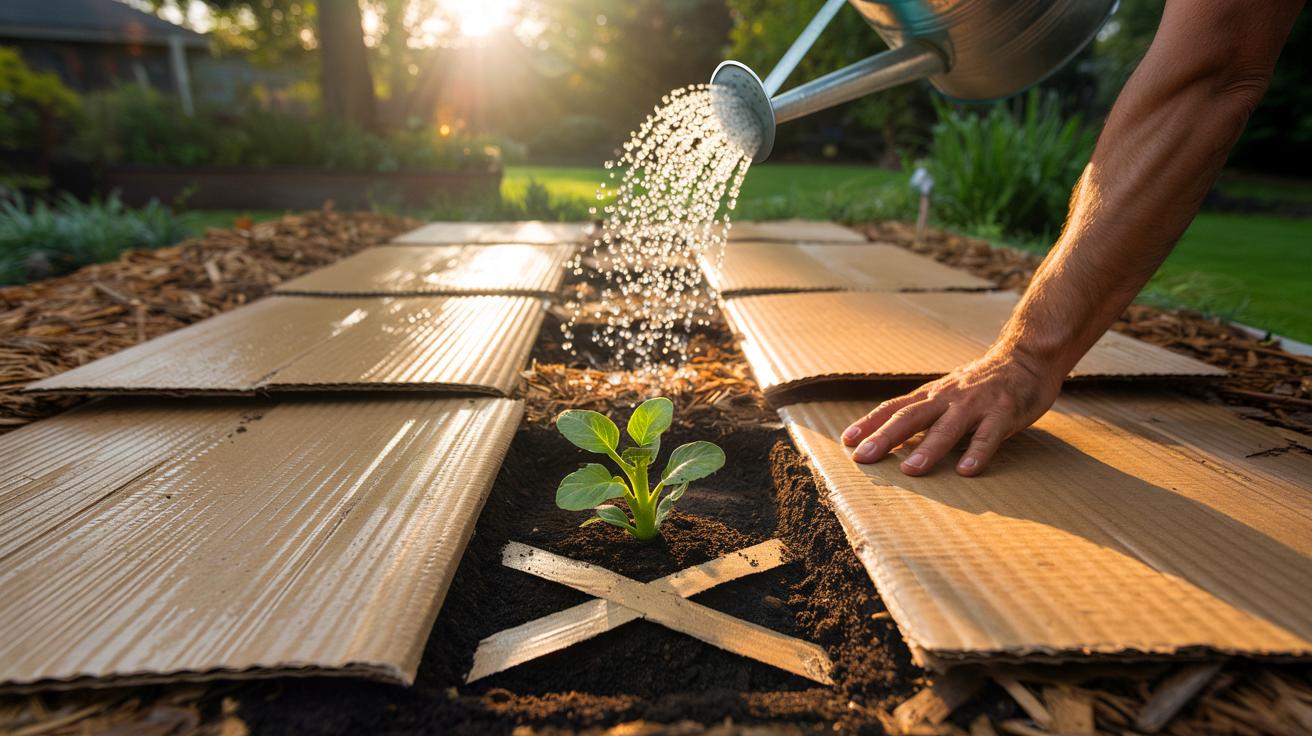
Start by scalping the area with a mower set low or by knocking down tall growth. No need to remove clippings; they add organic matter. Edge the perimeter to stop creeping grass from sneaking in. Lay the first sheet of cardboard and overlap each new piece by at least 6–8 inches. Around known invaders—quackgrass, Bermuda—overlap a foot. Soak as you go; a hose or watering can helps the sheets contour and knit together. Water is your glue.
On top, spread 1–2 inches of finished compost to buffer nitrogen and introduce microbes. Then add 2–4 inches of mulch—shredded leaves, arborist chips, straw (not hay), or pine needles depending on availability. This cap shields the cardboard from UV light and moderates temperature swings. Keep mulch off trunks and stems. If you’re planting immediately, slice X-shaped openings through the cardboard and tuck transplants into small pockets of compost. For direct seeding, wait until the cardboard softens or use a soil-filled trench along the row.
Maintain by checking seams after heavy rain or wind and topping up mulch as it settles. In most climates, the barrier weakens by midseason and is largely consumed within 6–12 months. That’s fine—its job is to reset the weed clock while you establish dense, living cover. Consistency—re-mulching, spot-weeding—turns a one-time trick into a system.
Benefits Backed by Soil Science
The gains stack up. First, moisture retention: shaded soil loses less water to evaporation, so many gardeners see irrigation needs fall noticeably during summer. Second, soil structure: fungi weave hyphae through decomposing fibers, and worms pull cardboard shreds into burrows, creating channels that improve infiltration and root penetration. Third, biology: a steady carbon feed supports a diverse microbial community that cycles nutrients more efficiently than a tilled bed.
Environmental dividends matter too. Every square foot of cardboard is a square foot without landscape fabric or herbicides. Unlike plastic mulch, which can fragment and persist, cardboard vanishes into humus. It also minimizes soil disturbance, preserving mycorrhizal networks that help plants trade sugars for minerals and water. Over time, that cooperation shows up in sturdier plants and fewer disease flare-ups. In lawn conversions, the approach helps sequester carbon by building aggregates instead of oxidizing them through repeated tillage.
There’s a practical angle: the method stores value in the shoulder seasons. Lay in fall, plant in spring, and you let winter moisture and microbes do the heavy lifting. For urban gardeners, the tactic turns a waste stream into a resource. Paired with compost and smart mulches, it becomes a low-cost, scalable tool for home plots, school gardens, and community farms alike.
Put simply, cardboard is more than a shipping container; it’s a bridge to healthier soil and calmer maintenance. The trick takes patience, good materials, and a willingness to let biology run. Do it once, do it well, and your beds will pay you back with fewer weeds and steadier moisture for seasons ahead. Small effort, compounding returns. Ready to test the barrier on a stubborn patch—or convert a chunk of lawn into food and flowers—what space will you transform first, and how will you measure the change?
Did you like it?4.4/5 (29)