In a nutshell
- 🧪 Explains how baking soda (sodium bicarbonate) neutralizes acids, provides gentle abrasion, and—paired with hot water and optional white vinegar—lifts residue and odors from P-traps.
- 🧼 Provides a clear step-by-step flush: 1/2 cup baking soda + 1/2–1 cup vinegar, wait 10–15 minutes, then 4 cups boiling water; includes disposal and shower-specific notes.
- 🔁 Recommends a practical maintenance schedule: weekly in kitchens, biweekly in baths, with monthly deep cleans; offers variations (salt grit, lemon juice, ice for disposals, occasional 3% hydrogen peroxide—never combined with vinegar).
- 🛠️ Clarifies when DIY stops: persistent slow drains or multi-fixture gurgles signal mechanical obstructions or vent issues; suggests snakes or pros and reminds to refill dry traps.
- 🚫 Stresses safety and prevention: never mix with bleach or chemical openers, avoid boiling water on vulnerable PVC/toilet drains, use mesh strainers, wipe grease, and limit disposal loads.
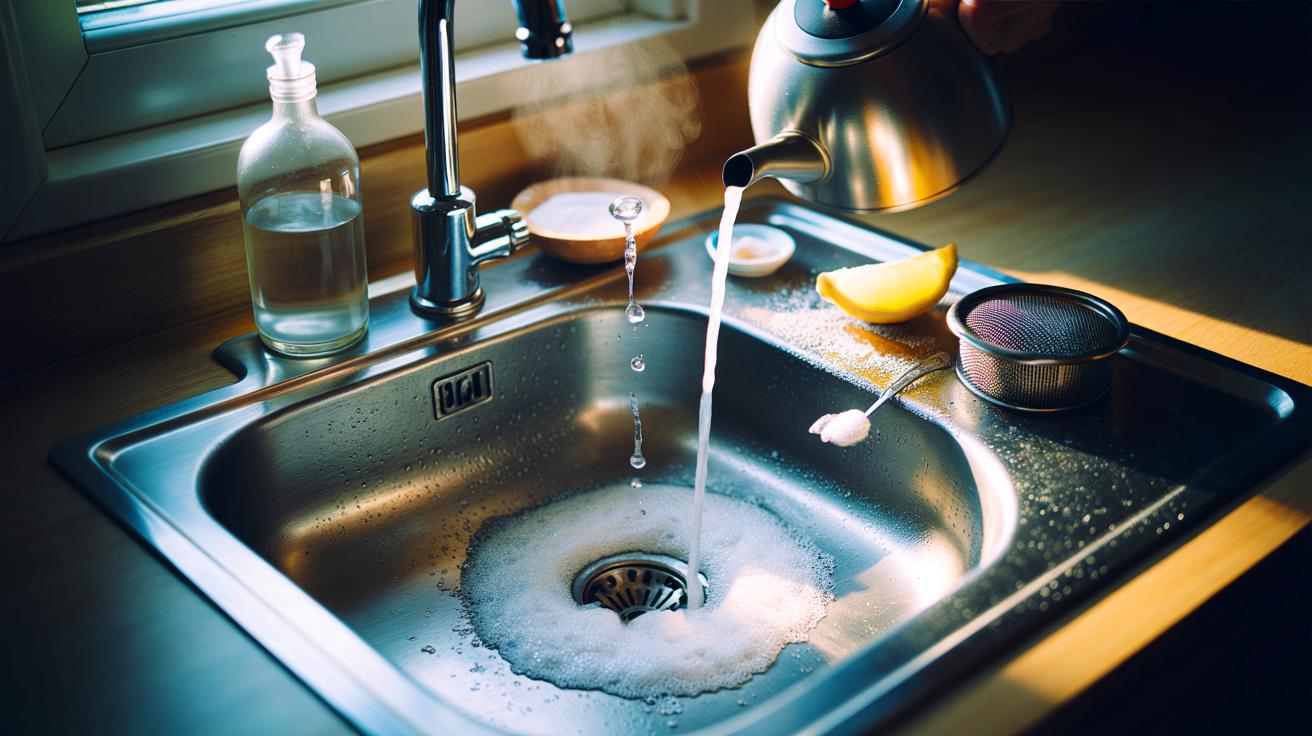
There’s a quiet hero in your pantry that can keep kitchen and bathroom drains fresh without harsh chemicals or expensive fixes: baking soda. This unassuming powder deodorizes, loosens film, and helps prevent that swampy, sulfuric waft that creeps up from pipes. The method is simple. It’s cheap. It works. In homes with garbage disposals, older plumbing, or high-traffic sinks, it can be a weekly ritual that saves you from emergency calls. Below, you’ll find the science, the step-by-step routine, smart variations, and a maintenance schedule designed for real life. If your drain smells today, the best time to start is now.
Why Baking Soda Works in Drains
At the heart of kitchen and bath odors lies a stew of decomposing organics and biofilm. Baking soda, or sodium bicarbonate, tackles both. As a mild alkali, it neutralizes acidic compounds that produce funky smells, from onion residues to the byproducts of bacteria. Its fine, crystalline texture adds a gentle abrasive action, helping dislodge the thin, grimy layer that clings to pipes and traps odors like a sponge. Unlike harsh drain openers, it won’t etch metal or ruin seals. It’s friendly to PVC. It’s safe around most fixtures.
Paired with hot water and, at times, white vinegar, baking soda becomes a dynamic cleaner. The bubbling you see is carbon dioxide released as an acid-base reaction agitates the muck. That fizz doesn’t “blast open” clogs like a power snake, but it does lift residue and helps deodorize the P-trap, where smells tend to accumulate. Think of it as pipe hygiene, not emergency surgery. Applied consistently, the result is a fresher drain and fewer slowdowns over time.
Step-by-Step: The Classic Baking Soda and Vinegar Flush
Start with a dry drain. Pour in 1/2 cup of baking soda, tapping the pipe to help the powder fall. Follow with 1/2 to 1 cup of white vinegar. The fizz rises; let it work for 10–15 minutes. For stubborn odors, cap the drain with a stopper to keep the reaction close to the gunk. Finish with a slow pour of boiling water—about 4 cups—to wash loosened debris down the line. In kitchen sinks with disposals, run cold water afterward and pulse the unit for 10 seconds to clear the chamber. Important: Never combine this method with bleach or chemical drain openers.
| Item | Amount | Purpose | Frequency |
|---|---|---|---|
| Baking soda | 1/2 cup | Neutralizes odor, mild scrub | Weekly |
| White vinegar | 1/2–1 cup | Reacts to lift residue | Weekly or as needed |
| Boiling water | 4 cups | Flushes loosened debris | Each treatment |
Need a midweek reset with no vinegar scent? Use the same baking soda dose, wait 10 minutes, then chase with very hot tap water for two minutes. It’s gentler but effective for maintenance. For shower drains, remove the hair catcher first and clear visible strands before treating. Do not use boiling water on toilet drains or with PVC traps not rated for high heat; hot tap water works there.
Maintenance Schedule and Smart Variations
Consistency beats intensity. For busy kitchens, schedule a weekly baking soda flush to prevent odor-causing biofilm. Bathrooms do well with a biweekly routine, especially if hair products or shaving cream build up. Once a month, deepen the clean: after the standard soda-vinegar cycle, let the drain sit for 30 minutes, then flush with boiling water and run hot tap water for another minute to move everything downstream. Routine beats rescue; that’s how you stay ahead of smells.
Variations help. Add 1 tablespoon of fine salt to your baking soda for extra grit on greasy film. Swap vinegar with lemon juice if you prefer a citrus note; the chemistry is similar, though the fizz is gentler. For disposal care, grind a few ice cubes and a teaspoon of baking soda first, then run the classic flush; the ice scours the impeller. A diluted 3% hydrogen peroxide rinse (1/2 cup, monthly) can freshen without bleach, but never combine it with vinegar in the drain. If you used a commercial opener recently, thoroughly flush with water and wait 24 hours before any DIY reactions.
When DIY Isn’t Enough and How to Prevent Backups
There’s a limit to pantry science. If water pools and drains slowly even after a flush, you likely have a mechanical obstruction: compacted hair, grease, or a foreign object. That calls for a drain snake or a pro. Gurgling from multiple fixtures suggests a venting issue or a deeper line problem—not a job for baking soda. Smells that persist after cleaning can also signal a dry trap; run water for 10 seconds to refill the bend and restore the seal. Odor without use often means the trap has evaporated.
Prevention is straightforward. Use mesh strainers in showers and sinks to catch hair and food. Wipe oily pans with a paper towel before washing to keep fats out of pipes. Limit disposal loads to small scraps, and run cold water during grinding to keep grease solid and movable. Once quarterly, remove and clean the sink’s pop-up stopper; it harbors slime. If you live with hard water, consider a periodic enzyme cleaner night soak—compatibly timed with your baking soda days—to nibble organic films in places your routine can’t reach.
Homes smell like what we pour down the drain, and small daily habits shape that story. The baking soda method is easy, inexpensive, and gentle on pipes, yet it delivers a surprisingly professional result when done on a schedule. Start with one sink, then build the habit across the house, tailoring frequency to use. Keep chemicals out, keep strainers in, and keep hot water handy. Your nose will notice first, your plumbing second. What’s your plan to make this five-minute ritual a permanent part of your home’s weekly rhythm?
Did you like it?4.8/5 (29)