In a nutshell
- 🌿 Use cooled starchy cooking water from rice or pasta and cap the pile with a damp paper/cardboard blanket to hydrate and reduce evaporation.
- 💧 How-to: cool and dilute if salty, skim oil, apply 2–4 cups to a 3×3 ft pile (1 cup for small bins), then add a wrung-sponge cover; avoid plastic or glossy materials.
- 🧪 Why it works: starch binds water and feeds microbes, while a breathable cover maintains roughly 50–60% moisture, stabilizes temperature, and limits odors and fruit flies.
- 🧰 Kitchen add-ins: mix coffee grounds with shredded paper, use frozen-thawed veggie scraps for slow-release moisture, add crushed eggshells for structure; avoid greasy residues and coated packaging.
- ⚖️ Results and checks: perform the squeeze test (1–2 drops is ideal), add dry browns if soggy, and expect faster breakdown with less turning and a richer, crumbly finish.
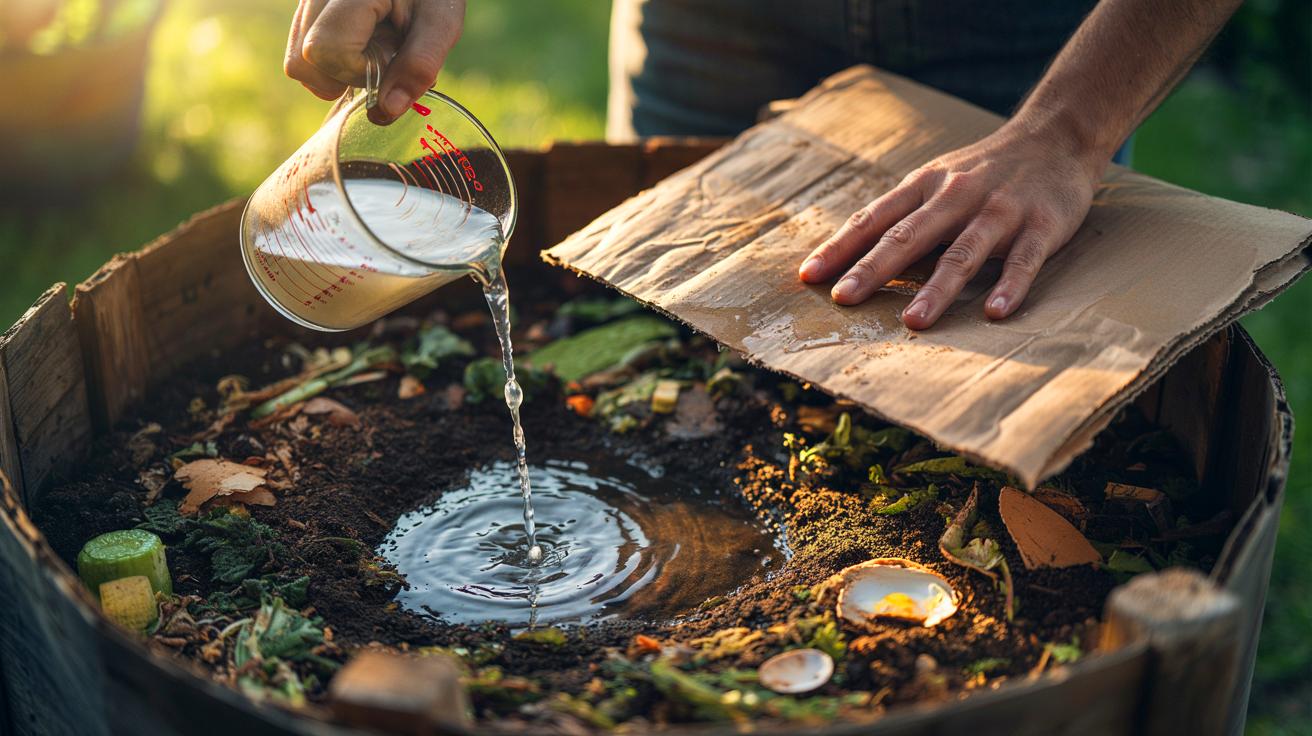
Every composter knows the heartbreak of a pile that runs dry. The top crust bakes, the core stalls, and the whole operation slows to a crawl. There’s a fix, and it doesn’t require fancy gear or a hose on standby. Look to your stove, sink, and recycling bin. The simplest trick for steady compost moisture is hiding in plain sight: use cooled starchy cooking water from rice or pasta and top the pile with a damp, breathable paper or cardboard blanket. This pairing locks in humidity, feeds microbes, and stabilizes temperature swings. It’s low cost, low effort, and high return for backyard bins and countertop worm farms alike. Your scraps will thank you with faster breakdown and fewer odors.
The Kitchen Trick: Starchy Water and a Paper Blanket
Here’s the core move: save the water left after boiling rice, pasta, or potatoes, let it cool, then pour it gently across the compost surface. Follow with a moistened sheet of brown paper bag, uncoated cardboard, or a flattened egg carton. This two-part technique keeps the top layer from drying out while providing a slow, microbe-friendly sip of moisture beneath. The starches in cooking water act like tiny sponges, binding water and giving decomposers an easy carb boost. Meanwhile, the cardboard cover reduces evaporation the way mulch protects garden soil—breathable, not airtight.
Skip salted or heavily oiled water. If seasoning crept in, dilute 1:10 with tap water before using. You’ll still deliver hydration without stressing worms or bacteria. Tear the cardboard into fit-size panels, mist until pliable, then lay it directly over new greens. The result is a stable microclimate that curbs crusting, discourages fruit flies, and moderates daily temperature swings. Think of it as a reusable lid that feeds your heap while it protects it. Simple. Cheap. Reliable.
How To Use It: Step-By-Step And Safety Notes
Start in the kitchen. After boiling rice, pasta, or potatoes, strain into a bowl to capture the water. Let it cool to room temperature. Taste a drop; if it’s salty, dilute with plain water until it tastes barely mineral. Skim any surface oil. In a typical 3-by-3-foot pile, start with 2 to 4 cups spread evenly across the top layer. For smaller bins, use 1 cup. Wait ten minutes, then add your damp paper or cardboard blanket—moist like a wrung-out sponge, never dripping.
Repeat as needed. Do the squeeze test: grab a handful from six inches down and squeeze hard. One or two drops means you’re on target; handfuls that stream mean you’re overdoing it. If soggy, remove the cover, fork in dry browns, and aerate. Maintain airflow: never use plastic sheets or glossy, coated boxes that trap gases and leach inks. Rotate the blanket every few days to prevent matting. In hot, windy weeks, re-mist the cover. In cold snaps, double-layer the paper to hold heat and moisture together. Keep it breathable and your compost stays alive, active, and sweet-smelling.
What To Add And What To Avoid From The Kitchen
The beauty of this method is how many household items play along. Coffee grounds and tea leaves add fine texture and modest moisture, but mix them with shredded paper to avoid compaction. Vegetable peels hydrate while contributing nitrogen; freeze scraps first to rupture cells, then thaw directly in the bin for a slow release of water. Crushed eggshells don’t add moisture but improve structure, helping air move around juicy greens. Balance is the rule: pair wet inputs with absorbent browns, then cap with your damp paper layer.
Steer clear of greasy residues, high-salt liquids, or glossy packaging. Compostable takeout liners can be waxed or PLA-coated—check labels before using them as covers. Citrus rinds are fine in moderation; bury them under the blanket to limit odor and surface drying. For clarity, here’s a quick reference to kitchen helpers:
| Kitchen Input | Moisture Effect | Notes |
|---|---|---|
| Rice/Pasta Water | High retention | Use cooled, unsalted; dilute if needed |
| Cardboard/Paper Bag | Evaporation shield | Uncoated only; moisten to wrung-sponge |
| Coffee Grounds | Moderate, can clump | Mix with shredded paper to aerate |
| Frozen-Thawed Veg Scraps | Slow-release moisture | Bury under cover to deter flies |
| Eggshells (Crushed) | None | Add structure and calcium |
Why It Works: Microbes, Starch, And Breathable Covers
Compost biology loves steady conditions. Microbes hum along best when moisture sits around 50–60 percent—damp but not dripping. Starch molecules in cooking water are long chains that bind and hold water in the pile’s matrix; they also offer a fast snack for bacteria that jump-starts heat and activity. When you add a damp paper blanket, you reduce evaporation from the top inch, the layer most vulnerable to sun and wind. The cover traps humidity while letting CO2 escape, preventing the sour conditions that develop under plastic.
Picture a forest floor: decomposing leaves form a soft, breathing mulch that shields soil and feeds it—your cardboard cap mimics that natural system. The result is better texture, fewer dry pockets, and more uniform breakdown of fibrous stems and peels. You’ll turn less often, yet see faster shrinkage and a richer, crumbly finish. Watch for signs: if the blanket smells off, you went too wet; if it crackles and curls, re-mist and add a cup of starchy water. This is composting by feel, using tools you already have.
In the end, this is a small ritual with outsized payoff. Save a pot of cooking water. Moisten a paper cap. Lay it down and let biology do the heavy lifting. By swapping a hose for kitchen leftovers, you stabilize moisture, speed decomposition, and keep odors at bay—without spending a dime. The practice scales from balcony bins to big backyard heaps, and it’s forgiving once you learn the squeeze test. Ready to try it tonight after dinner, and if you do, which kitchen staple will be your first moisture helper—starchy water, coffee grounds, or a humble cardboard lid?
Did you like it?4.5/5 (30)